***See the centerpoint-time-clock-employees.htm file instead.
CenterPoint Payroll®
- Using CenterPoint Time Clock for Employees
Related Help
 View or Print as PDF
This document contains detailed information about using the CenterPoint Time Clock website, CenterPoint Time Clock app, and CenterPoint Time Clock Kiosk for both employees and supervisors.
Employee Registration (One-time Setup)
Log In to CenterPoint Time Clock and Clock In or Enter Time
Review Time Entries, Review and Edit Time Entries, or View Time Entry History
Clock Out and Log Out of CenterPoint Time Clock
Using the CenterPoint Time Clock app
Using the CenterPoint Time Clock Kiosk
Employee Registration (One-time Setup)
- From a web browser, enter https://timeclock.redwingsoftware.com.
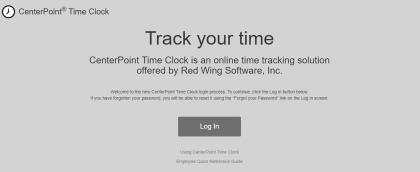
- Click Log In.

- Click Create One!.
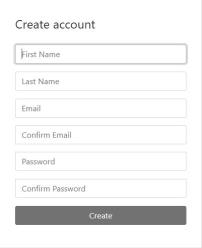
- Enter your First Name and Last Name.
- Enter an Email address and a Confirm Email address which must match the contents of the Email field for the registration to be processed.
- Enter a Password and Confirm Password. Passwords must be at least six characters and no longer than 25 characters, include one numerical character and one lower-case letter.
- Click Create.
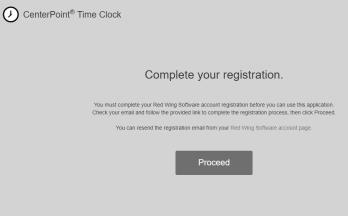
- Check the email address you provided above for an email from Red Wing Software.
Note: If the email is not received, please look in your Junk email folder.
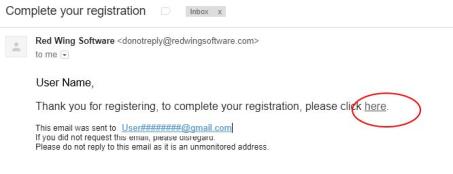
- Click the here link.
![]()
- From your web browser, click the CenterPoint Time Clock tab.

- Click Proceed.
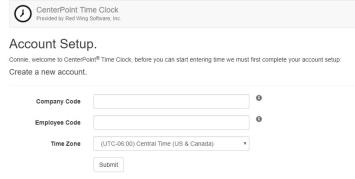
- Enter the Company Code provided to you by your payroll administrator.
- Enter your Employee Code (this is the employee Abbreviation used in CenterPoint Payroll).
- Select the Time Zone you work in. This will determine how the time clock displays when your employee code is logged into CenterPoint Time Clock.
- Click Submit.
- A confirmation email will be sent from CenterPoint Time Clock to the email address you provided during registration.
Note: If the email is not received, please look in your Junk email folder.

- Click the here link to begin using CenterPoint Time Clock.
Reset your Password
If you have forgotten your password and would like to reset the password, follow the steps below:
- From a web browser, enter https://timeclock.redwingsoftware.com.
- Click Log In.
- Select the Forgot your password? link.
- Enter your Email address.
- Click Email Link.
- An email will be sent to your current email address from Red Wing Software. Open the Reset Password email and click the here link.
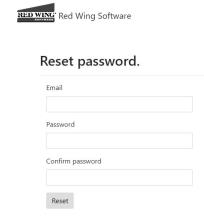
- Enter your Email address, your new Password, and then enter your new password again in the Confirm password box, and then click Reset.
Changing your Password
If you know your current password and would like to change the password, follow the steps below:
- From a web browser, enter https://timeclock.redwingsoftware.com.
- Click Log In.
- Enter your Email and Password and click Log In.
- In the upper-right corner, click the down-arrow next to your name, and then select View Account.
- Click Change Password.
- An email will be sent to your current email address. Open the Red Wing Software Change Password email and click the here link. Enter your Current Password, New Password, and Confirm New Password, and then click Update Password.
Log In to CenterPoint Time Clock and Clock In or Enter Time
- From a web browser, enter https://timeclock.redwingsoftware.com.
![]()
- Click Log In.
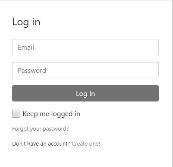
- Enter your Email and Password and click Log In.
- If you clock in or enter time for different companies, select the company you want to record time for and then click Select.
![]()
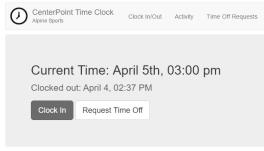
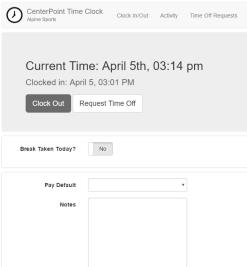
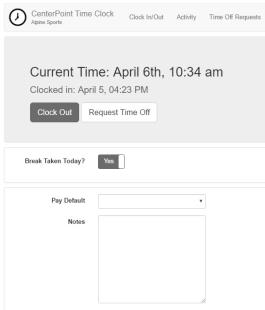
To Clock In
- If your company requires you to record your time entries by clocking in, click Clock In. If the Clock Out button displays, you are now clocked in.
- If your company requires you to enter additional information (pay default, pieces, profit center, location, project, department, or notes) the selection will display after clocking in. In the example below, the Pay Default and Notes were required entry by the employer.
- If you are required to log out of CenterPoint Time Clock after clocking in, in the upper-right corner of the screen, click the down-arrow next to your name, and then select Log Off.
To Enter Your Time
- If your company does not require you to clock in and allows you to add or modify time cards, click Activity, and then click Add to enter your time card.
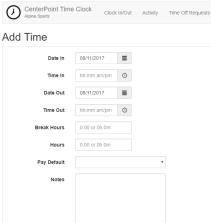
- Enter your DateIn and the Date Out will default to the date entered in the Date In box. The Time In and Time Out fields are optional and if you are not using the fields, then enter in Hours (if you are using the Time In and Time Out fields, the Hours will be automatically calculated). Enter Break Hours if you need to deduct time from the hours calculated for a break. Select or enter any additional information required by your employer for these hours. In this example, the Pay Default and Notes were required entry for this employer. Note: If more than one type of pay default were used in the same day, create a separate time card entry for each pay default.
Note: Break adjustments will display on the Activity screens with theicon.
- Click Save. The entry will display on the Activity screen.
Review Time Entries, Review and Add, Change, or Delete Time Entries, or View Time Entry History
To Review Time Entries
- Log into CenterPoint Time Clock.
- Click Activity to review your time entries.
To Review and Add, Change or Delete Time Entries
- Log into CenterPoint Time Clock.
- Click Activity.
- If your employer allows you to add, change, or delete time entries, your Activity screen displays similar as shown below:
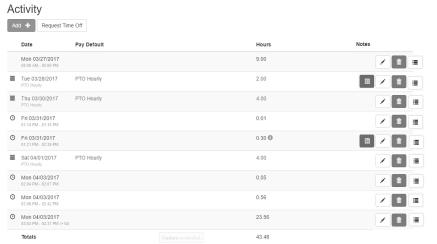
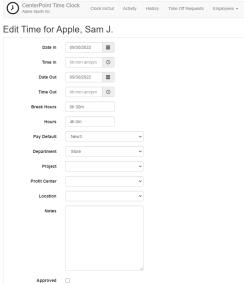
- To correct time entries or clocked entries (if allowed to manually enter time), click the
 Edit button next to the entry that needs to be modified and the Edit Time screen will display. Make your changes and then click Save. An entry can be removed by selecting the corresponding
  Trash Can button. An Audit Log can be viewed by clicking
  . Click the
  button to display the note.
To View Time Entry History
- Log into CenterPoint Time Clock.
- Click History.
- In the From/To Date range, enter the dates you wish to view historical time entries for.
- Click Go.

-
To view notes entered on a time card, click

-
An Audit Log can be viewed by clicking
 .
.
Clock Out and/or Log Out of CenterPoint Time Clock
To clock out and log out of CenterPoint Time Clock
- Log into CenterPoint Time Clock.
- If the Automatic Unpaid Lunch Break of set in Setup > Payroll Details > Time Clock Settings > Options tab is set to 1 minute or greater and::
There are clocked entries that have break hours greater than zero, the Break Taken Today? toggle will be set to Yes (the toggle is disabled so multiple breaks cannot be entered for this clock-out entry).
There are clocked entries that have no break hours, the Break Taken Today? toggle will be set to Yes and automatic break hours can be taken for this entry.
If the hours for the current time entry are less than the automatic break hours, the Break Taken Today? toggle will be set to No (the toggle is disabled to prevent negative net time).
Note: When the clocked entry is saved with an automatic break, the break length will be saved with the time card in the Break Hours box. The Break Taken Today? toggle will be disabled for subsequent clock-out entries for the same day. The break can be edited by a supervisor on the Employees > Employee Activity > Edit button > Edit Time screen.
- Enter any applicable required information for your employer, and then click Clock Out.
- In the upper-right corner of the screen, click the down-arrow next to your name, and then select Log Off.
To log out of CenterPoint Time Clock
- In the upper-right corner of the screen, click the down-arrow next to your name, and then select Log Off.
Request for Time Off
Submitting New Requests
- From the Clock In/Out or Activity screens, click Request Time Off or from the Time Off Requests screen, click New Request.
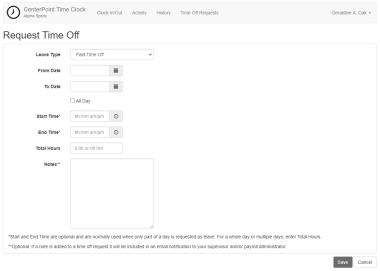
- In the Leave Type box, select a paid leave pay default (only leave pay defaults will display in this box if Setup > Payroll Details > Time Clock Settings > Options tab > Allow Time Off Requests check box is selected). To setup paid leave pay defaults, see Step C-9 d in the Time Clock Module - Payroll Administration Installation, Registration and Setup document for more information.
- Enter the time off request:
- Enter the date range being requested in the From Date/To Date boxes.
- If you are requesting a whole day or multiple days, check the All Day box and enter the Total Hours.
- Start and End Times are optional and are normally used when only part of a day is requested as leave. After entering the time range, the Total Hours requested will be calculated.
- Add an optional Note that will be included when your supervisor reviews your time entry.
- Click Save. The time off request will be generated and an email notification will be sent to the employee's supervisor for approval (if there isn't a supervisor, the email notification will be sent to the Administrator users).
Viewing Status of Time Off Requests
- Log into CenterPoint Time Clock.
- Select Time Off Requests.
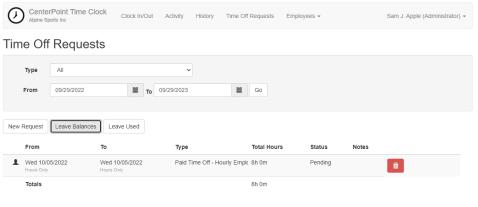
-
Use the Type and From/To Dates to filter for the type of request(s) you want to view within a specific date range.
-
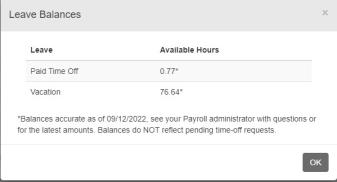
Click Leave Balances to view the Leave and Available Hours as of the last accrual (the Available Hours do not include pending time off requests).
-
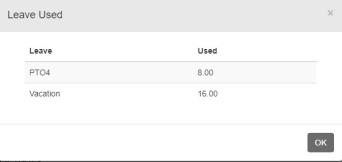
Click Leave Used to display all the leave pay defaults for an employee and any hours for pending time off requests. A pending time off request is an approved request that has not yet been imported into CenterPoint Payroll.
- The status of the time off requests are Pending, Approved, or Denied.
- Pending time off requests can be removed by clicking at which time an email notification is sent to the employee's supervisor or administrator.
- When a time off request is approved or denied by a supervisor or administrator, the requesting employee will receive an email notification.
- Pending time off requests can be removed by clicking
Changing Companies
If you work in more than one company using CenterPoint Time Clock, follow the steps below to change companies.
- Log into CenterPoint Time Clock.
- In the upper-right corner of the screen, click the down-arrow next to your name, and then select Change Company.
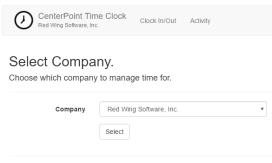
- Select the Company you want to use to enter hours.
- Click Select.
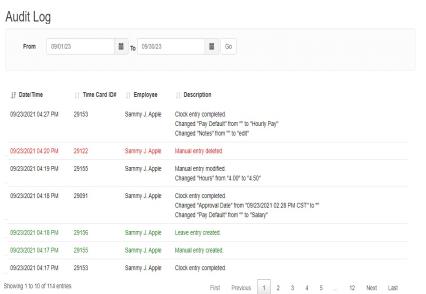
View Audit Log
The Audit Log displays created, modified, and deleted time cards. This allows employees and employers to know when time card entries are edited and what values changed in case there are any discrepancies between entered time, approved time, and final pay.
- Log into CenterPoint Time Clock.
- In the upper-right corner of the screen, click the down-arrow next to your name, and then select Audit Log.
-
After viewing the log, click Back.
Changing Application Settings
- Log into CenterPoint Time Clock.
- In the upper-right corner of the screen, click the down-arrow next to your name, and then select Settings.
Change Email
Note: This email address is used only for Time Off Request notifications sent through CenterPoint Time Clock and does not change the email address you enter on the Log In screen to log into CenterPoint Time Clock.
- Click Change next to your current email address.
- An email will be sent to your current email address. Open the CenterPoint Time Clock Change Email email and click the here link. Enter your New Email, Confirm New Email , and then click Change Email.
Change Time Zone
- Click Change next to your current time zone.
- Select your new Time Zone and then click Change Time Zone.
Register Additional Companies
- Click Register next to your current Company.
- Enter the Company Code provided by your employer, and your Employee Code.
- Click Register.
Change Period Filters
The pay period frequency allows you to set a time frame which data should be displayed in on the Activity, Employee Activity, and Employee Summary screens. By setting a pay period frequency, data can be viewed for the Previous, Current or Next time frame without resetting filters.
- Click Change next to the current period.
- In the Frequency box, select the period frequency - Daily, Weekly, Bi-Weekly, Semi-Monthly, Monthly (default), Quarterly, or Annually.
- Select the Starting date for the pay period frequency to begin.
- Click Apply.
Change Default Page
This option allows you to set the screen that should display by default each time you log into CenterPoint Time Clock.
- Click Change next to the current default page.
- Select the page you want to display as your default Clock In/Out or Activity.
- Click Change Default Page.
Set Defaults
This setting allows you to specify defaults that always display during time entry. For example, for the pay default - regular hours for an hourly employee. The fields an employee has to set a default for vary according to their employer setup. By setting defaults, time entry is faster and more accurate because the employee would only need to change the selection if they were recording hours that were out of the ordinary.
- Click Change next to Defaults.
- Select the values you would like to display by default during time entry.
- Any options Not Set will default to blank in time entry.
- Click Save Defaults.
Using the CenterPoint Time Clock app
The optional CenterPoint Time Clock app can be downloaded and used on individual employee mobile devices. Employees log into the app and the website with the same email address and password credentials.
- From the Apple App Store or Google Play Store, search for and install the CenterPoint Time Clock app.
Start CenterPoint Time Clock
- Open the CenterPoint Time Clock app.
- Click Log In. Enter your Email Address and Password and click Log In.
- If you clock in or enter time for different companies, select the company you are recording time for and then click Select.
Clock In
- Open the CenterPoint Time Clock app.
- Click CLOCK IN.
Clock Out
- Open the CenterPoint Time Clock app.
- Click CLOCK OUT.
- If your company requires you to determine if a Break was Taken Today? select Yes or No.
- If your company requires you to enter additional information, make your selections before clocking out. Select Save.
View Time Clock Activity
- Open the CenterPoint Time Clock app, select the Home icon, and then select Activity.
- Clocked entries display with a Clock icon.
- Time off requests display with a Calendar icon.
- Manual time entries do not display with an icon.
- If your employer has given you access to enter manual time entries, you can add, edit, or delete time.
- Add- Click Add, enter Date, Time In/Out or Hours,Break Hours, Pay Default, and then click Save.
- Edit - Click the time entry that needs to be modified, make your changes, and then click Save.
- Delete - Click the time entry that needs to be removed, and in the lower-right, click the Delete icon.
Request Time Off (if available)
- Open the CenterPoint Time Clock app, select the Home icon, select Time Off Requests, and then click Add.
- Enter the time off request:
- Enter the date range being requested in the From Date/To Date boxes.
- If you are requesting a whole day or multiple days, check the All Day box and enter the Total Hours.
- Start and End Times are optional and are normally used when only part of a day is requested as leave. After entering the time range, the Total Hours requested will be calculated.
- Add an optional Note that will be included when your supervisor reviews your time entry.
- Click Save.
View Status of Time Off Requests
- Open the CenterPoint Time Clock app, select the Home icon, and then select Time Off Requests.
- To filter the time off requests by date range, use the Filter icon at the lower right.
- The status of time off requests are Pending (gray left border), Approved (green left border and Checkmark icon), and Denied (red left border and X icon).
- Pending - Click the Delete icon to remove pending requests. An email notification will be sent to the employee's supervisor.
- Approved/Denied - When a time off request is approved or denied by a supervisor, the requesting employee will receive an email notification. If a Supervisor made a comment when approving or denying a time off request, the comment is included in the email notification to the employee .
Change Application Settings
Register Additional Companies
- Open the CenterPoint Time Clock app. In the upper-left, select the Home icon, select Settings, and then select Register.
- Enter the Company Code provided by your employer, and your Employee Code.
- Click Register.
Change Period Filters
The pay period frequency allows you to set a time frame which data should be displayed in on the Activity screen. By setting a pay period frequency, data can be viewed for the Previous, Current or Next time frame without resetting filters.
- Open the CenterPoint Time Clock app. In the upper-left, select the Home icon, select Settings, and then select Periods.
- In the Frequency box, select the period frequency - Daily, Weekly, Bi-Weekly, Semi-Monthly, Monthly (default), Quarterly, or Annually. Select Done.
- Select the Starting date for the pay period frequency to begin. Select Done.
- Select Save.
Set Defaults
This setting allows you to specify defaults that always display during time entry. For example, for the pay default - regular hours for an hourly employee. The fields an employee has to set a default for vary according to their employer setup. By setting defaults, time entry is faster and more accurate because the employee would only need to change the selection if they were recording hours that were out of the ordinary.
- Open the CenterPoint Time Clock app. In the upper left, select the Home icon, select Settings, and then select Defaults.
- Select the values you would like to display by default during time entry. Select Done.
- Any options Not Set will default to blank in time entry.
- Select Save.
Additional Options
- If you enter manual time and do not clock in or out, you can make the home page work to add time by selecting Home > Settings and enabling Time Entry Mode.
Set Alternate Supervisor (for Supervisors Only)
When an alternate supervisor is set all supervisor duties are switched to the alternate. The alternate supervisor can see activity and approve time/requests for the employees managed by the user. Note: The main supervisor will still have access to their employees' time clock data, but time off request notifications will go to the alternate supervisor.
- Open the CenterPoint Time Clock app. In the upper left, select the Home icon, select Settings, and then select Alternate Supervisor.
- Click the down-arrow next to your name on the upper-right side of the screen.
- If the setting is inactive, change the Off toggle to On.
- In the Supervisor box, select the supervisor that will approve time cards and cover for the main supervisor in their absence. Select Done.
- Select the From/To dates the alternate supervisor is active. The alternate supervisor will automatically inactivate after the To date. Select Done.
- Select Save.
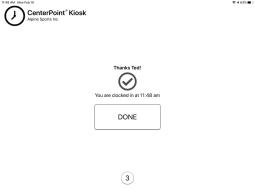
Using the CenterPoint Time Clock Kiosk
Clock In
- From the CenterPoint Time Clock Kiosk display, enter an employee PIN and click
 .
.
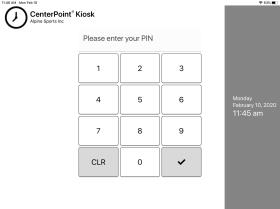
- From the Clocking In screen, confirm your identity by clicking Yes, That's Me or click I'm Not... and then repeat steps 1-2 again.
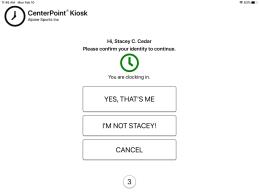
- When the following screen displays, the clock in process in complete. No action is necessary.
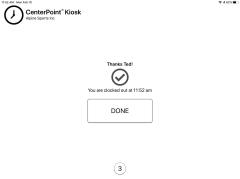
Clock Out
- Form the CenterPoint Time Clock Kiosk display, enter an employee PIN and click .

- From the Clocking Out screen, confirm your identity by clicking Yes, That's Me or click I'm Not... and then repeat steps 1-2 again.
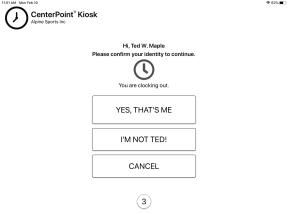
- If prompted to enter information regarding breaks, pay defaults, or notes, complete the entry and click Done.

- When the following screen displays, the clock out process is complete. No action is necessary.
|
Document: 3299 |
|---|